*EN
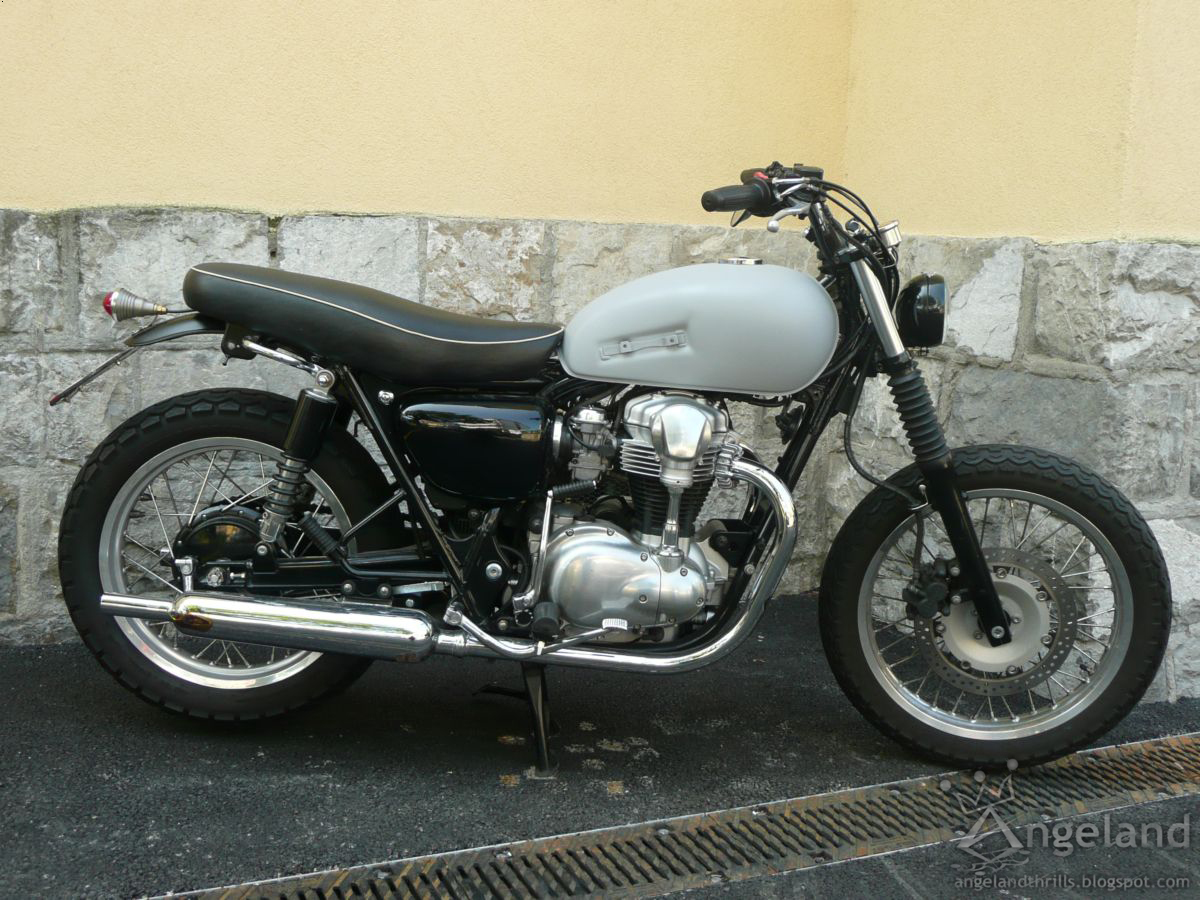
After riding my bike over a year with only the primer on the gas tank, I finally decided to give it a try.
For a spray painting made in a basement... It is not too bad. Even if I am never really satisfied, I am happy to see in real the design I had in my head. ^_^
I would like to thank my lovely wife for her extreme patience, and for the nice characters she painted under lot a of pressure. Sorry...
I also want to thank my friend Franco for his help and for pushing me to start.
*ES
Después de pasear mi moto más de un año con sólo la imprimación sobre el depósito de gasolina, por fin me decidí a intentarlo.
Siendo pintura en aerosol hecho en un sótano... No está tan mal. Aunque nunca estoy realmente satisfecho, estoy contento de ver en realidad el diseño que tenía en mi cabeza. ^_^
Quiero dar las gracias a mi querida esposa por su extrema paciencia, y por los bonitos caracteres que ha pintado bajo mucha presión. Lo siento...
También quiero dar las gracias a mi amigo Franco por su ayuda y por haberme empujado a empezar.
*FR
Après avoir baladé ma moto plus d'une année avec uniquement l’apprêt sur le réservoir d'essence, je me suis finalement décidé à essayer.
Pour une peinture en spray faite dans une cave... Elle n’est pas trop mal. Même si je ne suis jamais vraiment satisfait, je suis heureux de voir en vrai le design que j’avais dans la tête. ^_^
Je tiens à remercier ma chère épouse pour son extrême patience, et pour les beaux caractères qu’elle a peint sous beaucoup de pression. Désolé...
Je remercie également mon ami Franco pour son aide et pour m’avoir poussé à commencer.
Thrills, Passions, My Bikes, My Work, Music, Video, Kustom, Bobber, Chopper, Brat Style, Cafe Racer, Flat Track, Bikes, Tools, Hot Rod, Tattoo, Pin-up, Vintage, Old School, Japan, Angel, XS650, Vertical Twin, and more…
Showing posts with label My bikes. Show all posts
Monday, June 15, 2015
Monday, July 28, 2014
New work in progress... Part 3
Part 1 - New work in progress...
Part 2 - New work in progress... Part 2
*En:
... Finally I mounted it on my bike!!! ^_^
*Es:
... ¡¡¡Por fin lo he montado en mi moto!!! ^_^
*Fr:
... Enfin je l'ai monté sur ma moto!!! ^_^
Part 2 - New work in progress... Part 2
*En:
... Finally I mounted it on my bike!!! ^_^
*Es:
... ¡¡¡Por fin lo he montado en mi moto!!! ^_^
*Fr:
... Enfin je l'ai monté sur ma moto!!! ^_^
Friday, June 27, 2014
New work in progress... Part 2
Part 1 - New work in progress...
#En:
... So I spent some hours with hand files, sandpapers, etc…, and then I bent it. It looks not too bad…
Now I just need to work on a few more details and it will be ready. ^_^
#Es:
... Así que pasé unas cuantas horas con limas, papel abrasivo, etc…, y después la he curvado. No está nada mal…
Solo me queda finalizar algunos detalles y estará lista. ^_^
#Fr:
... J'ai donc passé quelques heures avec des limes, du papier abrasif, etc…, et ensuite je l’ai cintrée. Elle a l’aire pas trop mal…
Il ne me reste plus qu’à finaliser quelques détails et elle sera prête. ^_^
#En:
... So I spent some hours with hand files, sandpapers, etc…, and then I bent it. It looks not too bad…
Now I just need to work on a few more details and it will be ready. ^_^
#Es:
... Así que pasé unas cuantas horas con limas, papel abrasivo, etc…, y después la he curvado. No está nada mal…
Solo me queda finalizar algunos detalles y estará lista. ^_^
#Fr:
... J'ai donc passé quelques heures avec des limes, du papier abrasif, etc…, et ensuite je l’ai cintrée. Elle a l’aire pas trop mal…
Il ne me reste plus qu’à finaliser quelques détails et elle sera prête. ^_^
Thursday, May 29, 2014
New work in progress...
#En:
Lately I have been working on a new part during my spare time with not many tools: a cordless drill, a saw and some hand files.
Work still in progress...
#Es:
Últimamente he estado trabajando en una nueva pieza durante mi tiempo libre con pocas herramientas: un taladro sin cable, una sierra y algunas limas.
Trabajo en progreso...
#Fr:
Dernièrement, j'ai travaillé sur une nouvelle pièce pendant mon temps libre avec peu d'outils: une perceuse sans fil, une scie et des limes.
Travail en cours...
Lately I have been working on a new part during my spare time with not many tools: a cordless drill, a saw and some hand files.
Work still in progress...
#Es:
Últimamente he estado trabajando en una nueva pieza durante mi tiempo libre con pocas herramientas: un taladro sin cable, una sierra y algunas limas.
Trabajo en progreso...
#Fr:
Dernièrement, j'ai travaillé sur une nouvelle pièce pendant mon temps libre avec peu d'outils: une perceuse sans fil, une scie et des limes.
Travail en cours...
Tuesday, November 19, 2013
New Samurai tail light... in progress
This idea has been in my head for some time already.
Some years ago I got the Samurai helmets at a street market in Tokyo. Then I got the light and all the stuff, but I couldn't start building it...
Lately I had a bit of time, so I started it.
It is not completely done yet, but you can get an idea of how it would look like...
Some years ago I got the Samurai helmets at a street market in Tokyo. Then I got the light and all the stuff, but I couldn't start building it...
Lately I had a bit of time, so I started it.
It is not completely done yet, but you can get an idea of how it would look like...
Friday, November 2, 2012
My W650 Speedo and light indicators wiring diagram
Maybe this can be useful to someone...
As you can see on the diagram, two wires are not used because I do not have a rev counter and the Daytona Speedometer lighting turns on at the same time as the speedo.
Just in case...: ^_^
"This wiring diagram shows how I connected the speed meter and the light indicators on my Kawasaki W650. It has not been certified by a professional and (under no circumstances) I cannot be liable for any damage that could be caused by its use (good or bad)."
As you can see on the diagram, two wires are not used because I do not have a rev counter and the Daytona Speedometer lighting turns on at the same time as the speedo.
Just in case...: ^_^
"This wiring diagram shows how I connected the speed meter and the light indicators on my Kawasaki W650. It has not been certified by a professional and (under no circumstances) I cannot be liable for any damage that could be caused by its use (good or bad)."
Labels:
650,
Bike,
Kawasaki,
Light indicators,
My bikes,
My pics,
Speedometer,
W650,
Wiring diagram,
Work
Tuesday, September 18, 2012
My W650 - Few more pictures
I had a few more pictures of my W650 as the others weren’t really nice.
Yeaaaa, my son is ready to ride... ^_^
Wednesday, August 22, 2012
My W650 - in progress...
FINALLY I can ride my W650!!!
It is not done at all and many things are still in progress but I wanted to ride it this summer and see if the thing that I mounted are not going to fall... ^_^
Currently the tank got only the primer, but I like the colour. Next step: seat, front fender, shocks, tires, paint... If I find free time after my family obligations... ^_^
It is not done at all and many things are still in progress but I wanted to ride it this summer and see if the thing that I mounted are not going to fall... ^_^
Currently the tank got only the primer, but I like the colour. Next step: seat, front fender, shocks, tires, paint... If I find free time after my family obligations... ^_^
Wednesday, February 15, 2012
My W650 home made seat...
The idea is to make my W650 seat shorter, thinner and narrower than the original one and make it fit better the frame shape.
First the mold made in wood, covered with tape and plastic wrap.
The seat base made with fiberglass. It's the first time I work with this material, so it's not perfect but I think it will do the trick.
Next step: the foam and the cover…
First the mold made in wood, covered with tape and plastic wrap.
The seat base made with fiberglass. It's the first time I work with this material, so it's not perfect but I think it will do the trick.
Next step: the foam and the cover…
Friday, November 4, 2011
My W650
Last year I got a W650 and I started to modify it.
I removed the headlight and the stays, both fenders and later the clocks too.
A dirt track style handlebar with Gran Turismo style grips replaced the original parts.
I find the old orange headlight in a swap; I got it because it has a nice letter A on the glass. I painted it in mat black and I fixed on top the aluminum letter "A" with wings. The headlight bracket I made it from a stainless pan handle. I love recycling... ^_^
I made a new back fender from a XS400 or XS250 front fender. I cut it, made a bracket and painted in mat black.
The license plate light is a small one with LEDs that I hided between the fender and my license plate bracket.
My home made nargile (shisha) taillight find a place on the fender.
The speedometer is a Daytona, and the pilot led bracket I made it from a piece of stainless and an old double wrench size 13.
Next step, the seat. For the moment I only made a shape in wood that I will use the make the fibreglass base.
Then the gas tank will be changed or maybe I’ll just paint the original one…
Work in progress...
I removed the headlight and the stays, both fenders and later the clocks too.
A dirt track style handlebar with Gran Turismo style grips replaced the original parts.
I find the old orange headlight in a swap; I got it because it has a nice letter A on the glass. I painted it in mat black and I fixed on top the aluminum letter "A" with wings. The headlight bracket I made it from a stainless pan handle. I love recycling... ^_^
I made a new back fender from a XS400 or XS250 front fender. I cut it, made a bracket and painted in mat black.
The license plate light is a small one with LEDs that I hided between the fender and my license plate bracket.
My home made nargile (shisha) taillight find a place on the fender.
The speedometer is a Daytona, and the pilot led bracket I made it from a piece of stainless and an old double wrench size 13.
Next step, the seat. For the moment I only made a shape in wood that I will use the make the fibreglass base.
Then the gas tank will be changed or maybe I’ll just paint the original one…
Work in progress...
xs tracker
These are another aluminum part that I did some years ago by hand for my XS gas tank.
One it is done but the second is in standby. I need to find time for it...
Subscribe to:
Posts (Atom)